Tarrasch - Lasker, World Championship 1908
- marcoferrante
- Aug 9, 2020
- 3 min read
By now, you should have realised that I am going to torture this position of the Ruy Lopez (and you, my dear reader) a bit longer. But understanding open games means playing dynamic positions better and it is totally worth it.
1.e4 e5 2.Nf3 Nc6 3.Bb5 Nf6 4.0-0 d6 5.d4 Bd7 6.Nc3 Be7 7.Re1 exd4 (7...0-0? Tarrasch - Marco, 1892 1-0) 8.Nxd4 (diagram).
In the previous games, we saw several ideas connected to the creation of a weakness in c6, or to avoiding a massive trade of minor pieces with 9.Bf1 or 9.Nde2.
This question should then come very spontaneously: could not Black capture in d4 before castle, and then immediately exchange the knight and the bishop? The answer is: yes, he can. However, White will obtain again a powerful queen in the centre and the initiative, which translate to a stable slight advantage.

The answer is: yes, he can. 8...Nxd4 9.Qxd4 Bxb5 10.Bxb5 0-0 (diagram). However, White will obtain again a powerful queen in the centre and the initiative, which translate to a stable slight advantage.

11.Bg5 h6 (personally, I doubt that Bg5 is a strategical threat given that Black is well prepared to contrast the "pin"). 12.Bh4 Re8 13.Rad1 Nd7 (the famous idea) 14.Bxe7 Rxe7 15.Qc3 (diagram). Let's change perspective. In this position, White has a static advantage due to the extra space. He also has completed his development, which grants him the initiative. On the other hand, Black has managed to exchange three minor pieces, dramatically reducing White's attacking possibilities and therefore the meaning of his space advantage.

I won't discuss this game too much, as Kasparov has analysed it already. In the position below, rather than defending passively with 15...Nf8, Black played the inspired 15...Re5, which gains a tempo by attacking the knight. White cannot capture in c7 because after Nxc7, Rc5 wins the knight. The concept is very interesting, if you ponder about it. Black was struggling to catch up with White development and initiative, which is a matter of tempi, so he found a way to defend his pawn while attacking (therefore gaining a tempo).
The follow up is, however, unusual (not to say suspicious as Kasparov noticed). 16.Nd4 Rc5!? (diagram) but I will give a positive evaluation of the move because it had many psychological advantages. I imagine that Lasker was almost offended by his opponent and felt obliged to punish such a daring idea.

The game continued with 17.Qb3 Nb6 18.f4 Qf6 19.Qf3 Re8 (diagram). Here, Kasparov indicated 20.b3 (idea c4) as more precise than the text move 20.c3. However, he missed that after 20.b3? Nd5! 21.g3 Nc3 Black gets a good position (21.exd5 Rxe1+ 22.Rxe1 Qxd4+ and Black is better). This is one of the advantages of having powerful computers nowadays.

The game continued with 20...a5 21.b3 a4 (diagram). I like this game especially because Tarrasch tries to create one problem after another, and White is forced to take important decisions, which is not the type of game he was expecting to play before 15...Re5. You have to give to your opponent the opportunity to make mistakes, and this is exactly what Tarrasch is doing.

In fact, 22.b4?! Rc4 23.g3 Rd8 (diagram). Although it looks funny, from c4 the rook cannot be attacked, and Black is preparing the pawn break c5.

At this point, White would have had tried to be more objective and accept that Black is by no means worse. He could have played 24.a3 to prepare himself against c5.
Instead, he went for 24.Re3 c5 25.Nb5? (diagram) cxb4 26.Rxd6 Rxd6 27.e5.

Lasker made a dramatic error of calculation, entering what he though it was a brilliant tactical combination and got backfired. Can you see which move did he miss?
You have no more than 5 minutes.

It might be just a coincidence that the wandering rook is the piece who does the miracle, 27...Rxf4! 28.gxf4 Qg6+ 29.Kh1 (diagram). Black got material advantage and a totally won position.

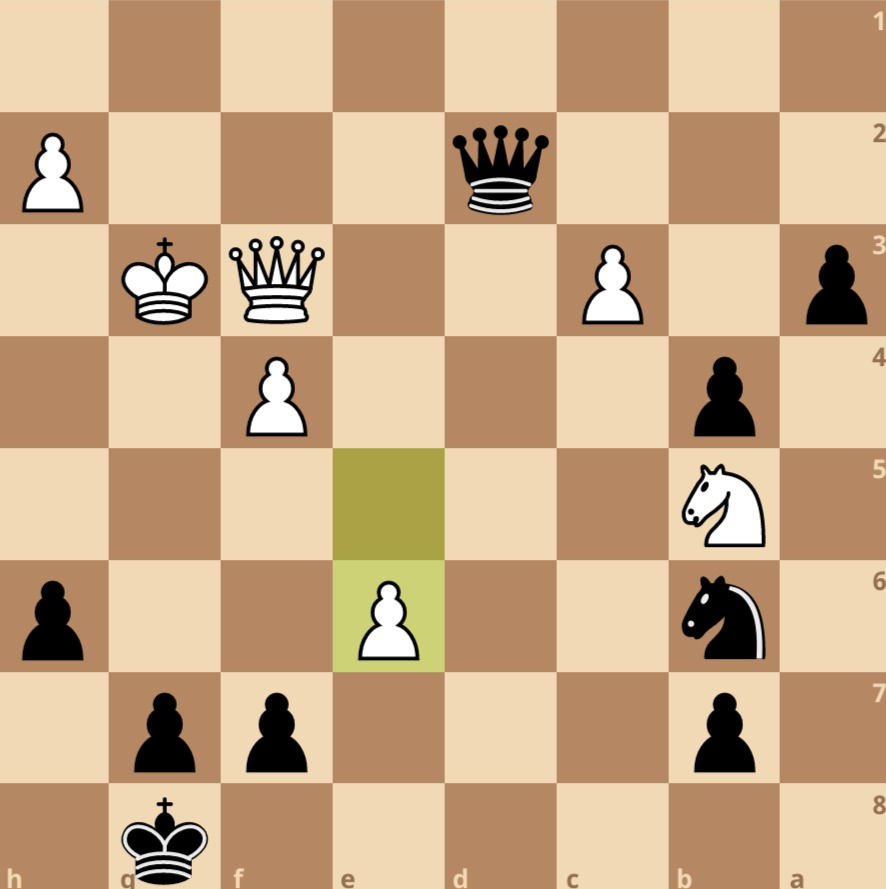
The rest of the game is "a matter of technique" 29...Qb1+ 30.Kg2 Rd2+ 31.Re2 Qxa2 32.Rxd2 Qxd2+ 33.Kg3 a3 34.e6 (diagram). White is rightly trying to mess up the position. Black must avoid complicate lines, he should instead neutralise White's hopes with 34...Qe1+

The game ended soon after 35.Kg4 Qxe6 36.f5 Qc4+ 37.Nd4 a2 38.Qd1 Nd5 39.Qa4 Nxc3 40.Qe8+ Kh7 41.Kh5 a1=Q 0-1 (diagram).


Comments